How to Encrypt a Mac OS X/macOS Computer with FileVault
FileVault is available on Mac OS X/macOS for encryption.
- Mac OS X 10.3 to 10.6 uses FileVault
- Mac OS X (Lion) and above use FileVault 2
What you will need:
- Your computer and your charger
- An external hard drive
- A power source

Please follow the instructions below for your specific operating system to encrypt your computer. Encryption can be risky if not done right, and it is essential that you follow the instructions carefully. If you have any questions, please contact privacy.matters@ubc.ca.
Stage 1: Check if your computer has already been encrypted
If your computer is already encrypted, don't encrypt again. To check if your computer has already been encrypted, follow the instructions on the UBC IT Knowledge Base.
Stage 2: Back up your computer
Mac OS X 10.3 and above
To back up your system in case of drive failure during encryption, follow these steps:
- Ensure your Mac is plugged into a power source.
- Connect the external hard drive to your Mac using the USB cable.
- Time Machine should ask to use your drive, if not, follow step 4 (below) to open Time Machine manually.
- Select ‘Open Time Machine preferences’ from the Time Machine.
Click ‘Select Backup Disk…’ and choose the ‘External Drive’. Ensure the ‘Encrypt Back Up Disk’ option is checked, then click ‘Use Disk’. Do not turn off your computer until the process completes. The backup may take several hours depending on the size of your data.
- Once complete, choose ‘Backup Now’ from the Time Machine menu.

Stage 3: Enable FileVault to encrypt your computer
Mac OS X 10.3 and above
- Ensure your Mac is plugged into a power source. Unless prompted, do not turn off your Mac during this process.
- Click the Apple Menu, choose ‘System Preferences’, then click ‘Security and Privacy’.
- Click the ‘FileVault’ tab
- Click the lock icon and enter your credentials when prompted
Click ‘Turn on FileVault…’
If the Mac has multiple users, you need to enter each users’ password to enable them to unlock the disk at startup. Select ‘Enable User’ and enter the user credentials for each user account. User accounts created after enabling FileVault will have this by default. Once all users are enabled, click ‘continue’.
- Choose where to save recovery key:
- Newer versions of Mac OS X/macOS: It is highly recommended that you allow iCloud store your recovery key using your Apple ID account (as pictured below). It is recommend that you also save a copy of your recovery key to your personal network storage drive (UBC Home Drive - Vancouver; F: Drive - Okanagan), so that IT Support Staff can assist you in the event of an incident.
Older versions of Mac OS X: There is no option to save your recovery key to the iCloud with older versions. You will therefore need to create a recovery key and store it in a safe place off of the Mac, preferably in multiple safe places. It is recommend that you save your recovery key to your personal network storage drive (UBC Home Drive - Vancouver; F: Drive - Okanagan), so that University IT Support Staff can assist you in the event of an incident.
- It is recommended that you create a second recovery key and store it in a safe place off of the Mac you have encrypted, preferably in multiple safe places. See the options available to users to store their encryption recovery keys in the Encryption FAQ.
How to encrypt an external USB drive using FileVault
- Insert the USB drive
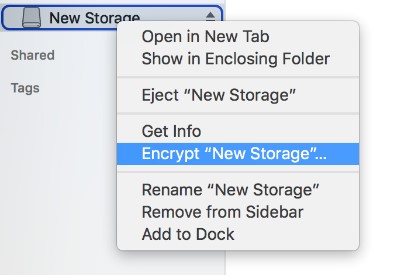
Control-click (or right-click if available) the USB drive icon that appears and choose 'Encrypt "Device Name"' from the menu (as below)
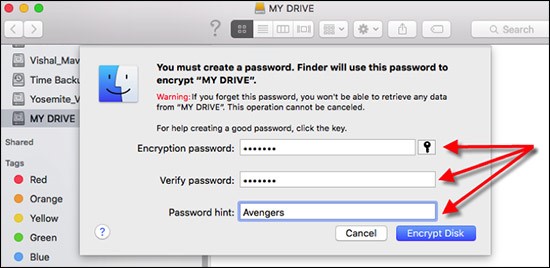
Enter and verify a password. Make sure that this password is something which you will remember. Once you have entered a password hint, then click Encrypt Disk (this may take some time)